Introduction
Welcome to a tale woven with adventure, creativity, and a touch of West Virginian charm. Our journey began in the digital landscapes of Fallout 76, where the post-apocalyptic wilderness of West Virginia unfolded before us in stunning detail. Hours turned into days as my dad and I roamed the virtual wastelands, discovering hidden treasures, battling West Virginia monsters like the Mothman and the Grafton Monster, and uncovering the remnants of a world long gone.
It was during those adventures that we stumbled across the Fasnacht event in Helvetia, West Virginia. Fallout 76 recreated the event with colorful masks, music, robots marching through town, and references to local traditions we had somehow never heard of before despite living in West Virginia ourselves. Seeing this tiny mountain town and its traditions immortalized inside a Fallout game instantly made us want to experience it in real life. Before long, we decided that if we were going to Fasnacht, we needed masks of our own.
Discovering Fasnacht in Fallout 76
Our introduction to Fasnacht in Fallout 76 felt like uncovering a hidden gem buried deep inside the game world. Fallout has always been great at environmental storytelling, but seeing actual West Virginia traditions represented in a major game felt different. It felt personal. The game captured Helvetia as this strange, charming little town full of folklore, old traditions, music, bonfires, and bizarre masks.
The more we looked into the real event, the more fascinated we became.
Fasnacht, derived from the German word “Fastnacht,” is a traditional pre-Lenten celebration brought to Helvetia by Swiss immigrants in the late 1800s. The event is centered around driving away Old Man Winter and welcoming spring. In Helvetia, the celebration includes handmade masks, music, food, dancing, and a nighttime parade through the town ending with the burning of Old Man Winter himself.
Helvetia is tiny, tucked away in the mountains of West Virginia, but during Fasnacht it transforms completely. People travel from all over just to experience the celebration. Fallout 76 introduced us to a piece of Appalachian culture we otherwise may never have discovered, and once we learned more about it, we knew we had to go.
Of course, we also knew we couldn’t show up empty handed.
Creating the Monster Man Mask
For our first Fasnacht, I decided to create a mask inspired by the Monster Man mask from Fallout 76, one of my favorite mask designs in the game.
The build started with a giant balloon that became the base of the head. Once I had the rough size and shape I wanted, I started layering paper mache over the balloon to create the shell of the mask. Paper mache is messy, time consuming, and takes forever to dry, but it’s also surprisingly durable once enough layers are built up.
After the base hardened, I started working on the facial features. The nose was created using tinfoil wrapped around a manipulated wire hanger that I bent into shape by hand. Once I liked the shape, I paper mached over the entire thing and attached it to the head.
The eyes were formed using tinfoil underneath layers of paper mache, while the lips were built up using thicker paper mache to create more dimension around the mouth area. The teeth were cut individually from poster board and glued into place one at a time. At this point the mask looked absolutely insane sitting on my desk, but slowly it started becoming recognizable.
Once the structure was complete, it was finally time for paint.
I painted the mask before starting what was probably the most tedious part of the entire project: the hair. The hair was made entirely from folded strips of red cardstock glued individually onto the mask. Over. And over. And over again. It felt like it took forever.
Finally, I cut out eye holes… sort of.
That decision would come back to haunt me later.
Fasnacht Night: Cold, Dark, and Barely Visible
The night of Fasnacht finally arrived, and honestly, it was incredible.
We explored the town, grabbed some Helvetia souvenirs, walked around looking at everyone’s costumes and masks, and soaked in the atmosphere. There’s something surreal about seeing this tiny mountain town completely transformed by music, bonfires, masks, and hundreds of people celebrating together in freezing temperatures.
And it was freezing.
Not “a little chilly” freezing. My toes legitimately felt like ice cubes by the end of the night. The cold settled into everything. On top of that, it was much darker than I expected. Once the parade started moving, visibility inside my mask became a real issue.
By “real issue,” I mean I could pretty much only see out of one eye hole.
Most of the parade was me grabbing onto whoever was closest and blindly walking forward while occasionally catching glimpses of the festivities whenever somebody nearby had a lantern or flashlight bright enough to light things up. It felt like navigating through darkness using random flashes of vision every few seconds.
As ridiculous as it sounds now, it actually made the experience kind of hilarious and memorable.
That first year taught us a lot:
- Visibility matters way more than you think.
- Start building masks earlier.
- Wear at least two pairs of socks.
Year Two: Learning From Our Mistakes
For our second Fasnacht trip, we went in much more prepared.
We gave ourselves more time to work on the masks instead of procrastinating until the last minute. We also knew visibility had to become a top priority. And most importantly, we knew exactly how cold it was going to be this time around.
This year I decided to create a Deathclaw mask.
Choosing the Deathclaw
I selected the Deathclaw as my mask’s theme due to its menacing yet iconic design and my long-time fascination with the Fallout series. The creature’s formidable presence in the game made it one of those enemies you never forget encountering for the first time. If you accidentally stumbled into a Deathclaw area too early in the game, you were probably about to have a very bad time.
I wanted my mask to capture that same feeling.
The Deathclaw also gave me opportunities to improve on things I struggled with during year one. The design naturally allowed for better visibility by placing my face inside the creature’s mouth instead of behind tiny eye holes. It also let me experiment with larger structural elements like horns and more complicated shapes.
Building the Deathclaw Mask
Knowing visibility was important this time, I started with a wearable face mask as the foundation of the build. This served multiple purposes. First, it hid my face inside the black interior of the creature’s mouth. Second, it gave me something secure to strap directly onto my head using Velcro. And finally, it helped distribute at least some of the mask’s weight.
The large horns on the sides of the Deathclaw’s head were made from wire and tinfoil, a trick I learned from year one. Once I had the rough shape I wanted, I layered paper mache over them using cheap paper towels, which actually created a pretty interesting texture naturally.
The teeth were made using a moldable thermoplastic that comes as little plastic pellets. You heat water, pour the pellets in, and they become soft and moldable. Once removed from the water they harden surprisingly quickly, but there was still enough working time to shape each tooth individually before they cooled.
I also used this same material for the eyes, although honestly, looking back, golf balls probably would have worked just fine and saved me some effort.
The mouth structure itself was mostly wire and tinfoil, while the top of the head used cardboard covered in paper mache. One major thing I learned during this process is that paper mache absolutely hates sticking to wire and foil by themselves. You really need some kind of solid base material underneath or you end up compensating by adding way more layers than necessary.
It worked in the end, but there were definitely moments where I realized I probably should have used cardboard much more heavily throughout the structure.
The horns and teeth were attached using hot glue before being blended into the rest of the mask with more paper mache. Slowly, the Deathclaw started looking less like random craft supplies glued together and more like an actual creature.
Painting and Finishing Details
Once construction was finished, it was time for paint.
I used a combination of spray paints and acrylic paints to create the Deathclaw’s skin tones and details. The mouth area got a glossy finish to make it look wet and more organic, while darker washes added depth to the cracks and textures throughout the face.
One of my favorite finishing details was adding fake saliva around the teeth using hot glue. It sounds ridiculous, but once stretched and layered carefully, the glue actually created a surprisingly gross and realistic effect.
As I put the finishing touches on the Deathclaw mask, I realized procrastination had once again gotten the best of me, and the mask didn’t quite sit how I originally imagined. Still, it worked far better than my first mask, especially when it came to visibility. It definitely wasn’t perfect though. There was a lot of weight sitting on my head and it wasn’t distributed very well, but for a few hours at Fasnacht it would absolutely do the trick.
The Moon Man Mask
Meanwhile, my dad embarked on creating the Moon Man mask inspired by Fallout 76 and the classic 1902 black and white film A Trip to the Moon by Georges Méliès. The film famously features astronomers launching a missile into the moon’s eye, creating one of the most iconic images in film history. Fallout references this imagery heavily with its version of the Moon Man.
His process was similar to my first year’s mask build. He started with a balloon base layered in paper mache before adding clay details to create the moon’s craters and texture. The missile itself was made from a pool noodle, which honestly worked surprisingly well once painted and integrated into the mask.
The final result looked both creepy and weirdly charming in the best possible way.
Fasnacht Year Two
The second year felt completely different from the first.
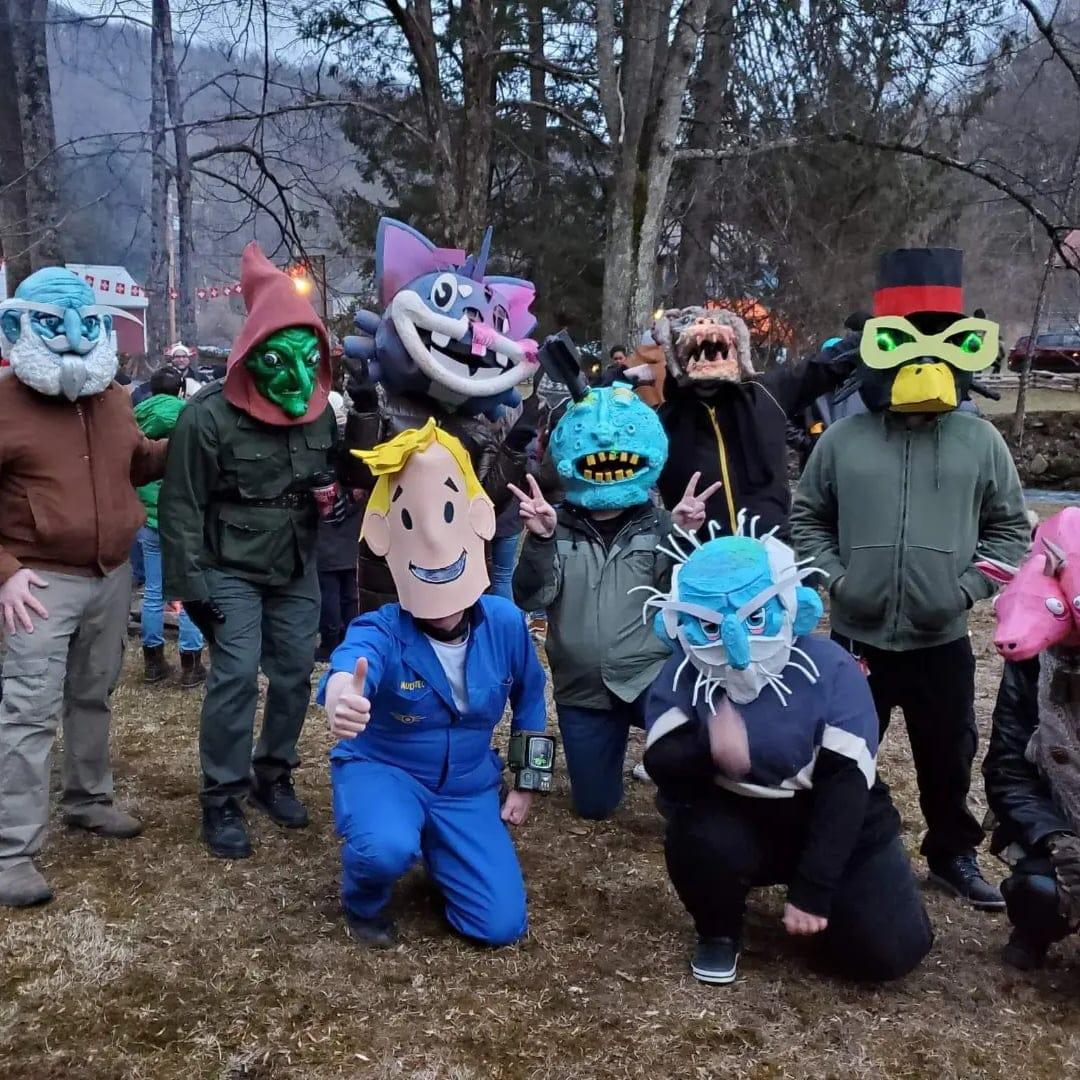
Not only were we more prepared, but there were dramatically more Fallout fans this time around. During our first trip we only saw a handful of people referencing the game. This year, Fallout masks and costumes were everywhere. Everywhere you looked there were masks we recognized from the game wandering through Helvetia alongside traditional Fasnacht costumes.
It genuinely felt like Fallout 76 had introduced an entirely new generation of people to the celebration.
The parade itself was also far more enjoyable this year simply because I could actually see what was happening. Instead of blindly stumbling through darkness holding onto strangers for guidance, I could finally take in the atmosphere properly. The parade wound through town surrounded by music, lights, costumes, and bonfires before eventually ending near a massive fire where everyone gathered together against the freezing cold.
The combination of local tradition, gaming culture, creativity, and community created an atmosphere that’s honestly hard to describe unless you experience it yourself.
Conclusion
What started as a Fallout 76 curiosity turned into one of the most memorable traditions my family has experienced together.
Fasnacht became more than just a parade or a road trip. It became a creative challenge, a reason to build things with our hands, and a way to connect gaming with real-world history and culture. From stumbling blindly through the freezing dark in year one to improving our masks and seeing Helvetia filled with Fallout fans in year two, every part of the experience felt unique and unforgettable.
And honestly, that’s part of what makes Fasnacht special.
It’s weird.
It’s creative.
It’s cold.
It’s chaotic.
And we’ll absolutely be back again.